Showing posts with label Free. Show all posts

Saturday, June 22, 2013

Sedge Stitch Tutorial (Free!)

The Sedge Stitch is a stitch I completely
* L * o * V * e *
and I wanted to share it with everyone,
especially those of you who saw and loved my version of
The Circus Sweater

So before we get this tutorial-party started
I will mention a couple of things....

This tutorial is for the *stitch*, not for any finished item
(though I've included a selection of pictures of finished sedge-stitched things).

I include the instructions for each picture
*BELOW* the picture.
If you're like me, excessive scrolling will confuse you,
so just keep that in mind.

You can use
*any yarn*
and
*any hook size*
to make
*almost anything*
that you want.

So with no further ramblings,
I happily present:

*The Sedge Stitch Tutorial*


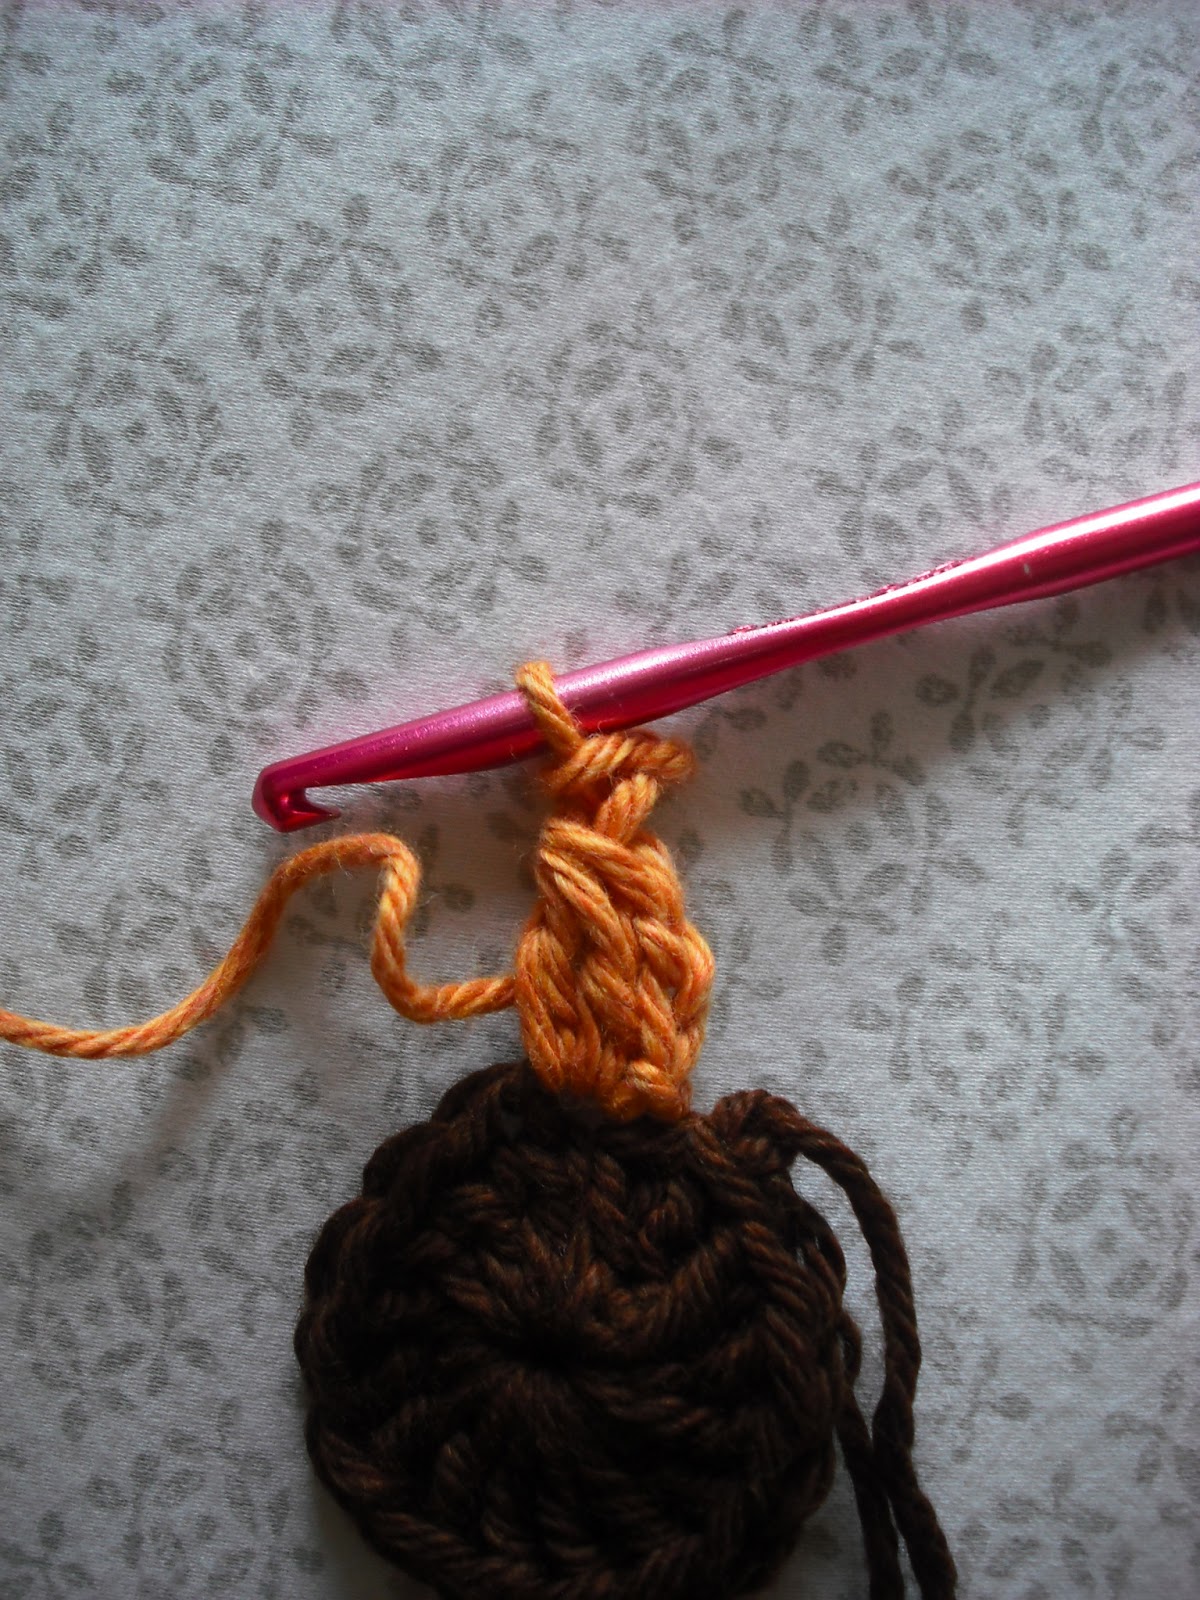
To begin, chain a length in multiples of 3. I chained 36.


In the second stitch from the hook, work a single crochet, a half-double crochet, and a double crochet. (Disregard the cat hair on the floor.)


Skip two stitches, and in the third stitch work another single crochet, half-double crochet, and double crochet. You repeat this step all the way across. (Be brave!)


Now you've reached the end of your row and you have one stitch left. (It's not a mistake!)


Single crochet into the last stitch. (YES!)


Chain 2 and turn your work! (Onward to our second row!)


In the last stitch of the previous row you'll work a double crochet. (See, it's like a half cluster.)


Skip two stitches, and in the single crochet of the previous row, work your cluster again: single crochet, half-double crochet, double crochet. Keep repeating that step until you've reached the end of the row.


Locate the very last stitch of the previous row. (It's tricky, it kind of hides.)


Work a single crochet into the very last stitch. (Row 2 is CoMpLeTeD!)


Two rows painlessly completed. Now, chain two and turn.


Row 3: Begin! In the first stitch of the previous row work a double crochet.


Skip two stitches, and in the third stitch work your cluster: single crochet, half-double crochet, double crochet. Repeat across. (You've probably gotten the gist of this by now. Hang on, one more thing of note left.)


Now you're at the end of the row. Notice there's no single crochet in the previous row, but your turning chain and your double crochet. That's exactly how it will be from here out. So...


Work your single crochet into the turning chain of the previous row.


If you keep going, eventually your stitches will look like this.


And this. Easy peasy!!
So,
In Abbreviated Crochet Terms...
To begin, chain a length in multiples of 3. (I chained 36 for this project.)
Row 1: In the 2nd ch from the hook work sc, hdc, dc. *Skip 2 st, in 3rd st work sc, hdc, dc * across. In last ch st work sc. Ch 2, turn.
Row 2: In sc of prev row, work 1 dc. *Skip 2 st of prev row, work sc, hdc, dc into sc of prev row * repeat across. In last stitch work a sc. Ch 2, turn.
Row 3: In first stitch of prev row, work 1 dc. *Skip 2 st of prev row, work sc, hdc, dc into sc of prev row * across. Sc in turning ch of prev row. Ch2, turn.
Repeat Row 3.
To increase, work additional clusters into beginning or ending stitches.
To decrease, skip clusters in beginning or ending stitches.


From this tutorial I made a coffee cozy (sah cuuuute!). These itty bitty projects are a great way to practice a new stitch. Just sayin'!


And, of course, the Circus Sweater.


Enjoy your sedge stitching!!

Have a Lovely Day!
~Jess

***

Wednesday, June 5, 2013

Any 10 Squares Bag (Finished! and a simple How-To)

I made this bag on a whim. All you need is 10 squares of the same shape. They can be any square pattern, but I used the Sunburst Granny for my first attempt because it's such a beautiful stitch. I think my squares measured 4.5" across. Tweaking the size of the square will tweak the size of the bag (so, uh, that was probably obvious information, but it's relevant to point out, nonetheless). Anyway, you can join as you go (as I did) or stitch them all together after.
10 Squares total

6 will lie flat; 4 will be folded


Hopefully my pictures make it easy to see how the bag was assembled. I have 3 flat squares on each side- 2 for the top corners, 1 for the center (3 x 2 = 6). For the other 4 squares, they are folded squares that give the bag its bag shape. They were a bit trickier to join, but I managed, as you see.

Oh, you haven't seen.
Well, you should.
Take a peek!
 Ooooh sah petty!

 I have a friend who is an amazing seamstress. She's going to make a liner for the bag. I don't know if it's necessary, but it will help it keep it's shape and stay useable for years.


 To finish, I hdc around.


For the handle, I joined the yarn to the top corner of the bag. I chained 60, slip stitched into the opposite corner (on the same side- that's important). I sc into the next stitch, skipped 2 stitches and worked 5dc in the 3rd stitch. *Skip 2 stitches, 1 sc in 3rd stitch, skip 2 stitches, 5dc in 3rd stitch * across. When I got to the end I slip stitched into the corner and fastened off.


This bag is destined for a charity sale, but I think I'll make another one using a solid color in an interesting motif. Sah-petty!

Have a Lovely Day!
~Jess

***

Thursday, May 23, 2013

Sunflower Tutorial (My Favorite!)


Sunflowers have always been my favorite. Lately, as I work on my Meal-a-Day crochet fundraiser, I find myself gravitating towards crocheting lots of cheery sunflowers for pins, garlands and bows. Since it's only 2 rounds (that's it!), I thought it'd be ideal to share with you. Fast and fun!


Purple Chair Crochet Presents:
** Sunflower Tutorial **

You will need:
Color A: Center color (yellow, green or brown works best)
Color B: Sunflower colored yarn (yellows, generally, but they come in reds, oranges, and even some green)
1 crochet hook (appropriate size for yarn weight)
Scissors
Yarn needle


To begin: With Color A, chain 4 and slip stitch to the first chain.
Round 1: Chain 2 (counts as 1st dc), and dc 15 more in the loop. Join with a slip stitch and fasten off (if desired).  16 double crochet.

Round 2:  Join Color B to any stitch and chain 2.

 In the same stitch, double crochet 2 together.

 Chain 2, slip stitch into the first chain.

 Chain 2, slip stitch into the same stitch.
One petal completed.
Hey look, a bird face!
Ahem.
Continue repeating these petals around. Join with slip stitch, fasten off and weave in ends.


Tah-dah! Add a pin, a hair clip, string them along a garland. Crochet some big green leaves and a stem (maybe that will be an addition to my little tutorial). Sew them to a pillow, a blanket, a hat. Frame it in a shadow box. Hang them on a mobile. Anything. Really.


I made one for myself using all yellow and added this perfectly proportioned button and a pin on the back. I'm wearing it now.


Have a Lovely Day!
~Jess

***

Thursday, January 24, 2013

Avocado Doily (Finished!)


 I've been hoarding my Avocado Yarn for, uh, awhile now. Finally, in an effort to do something (we've been sickies over here for most of January), I pulled out my hooks, my avocado-yarn and a pretty pattern I've had stuck up on my wall in my studio.


Boom. Beautiful doily, complete.


But I had yarn left, and these colors are too perfect with my couch , so I went all out and made 3. I have a thing for motifs.


Now that you're all smitten with doily fever, here's where I have to, sadly, inform you that I have no idea where this pattern is from. I printed it years ago... I do remember that it was free... and it's in Japanese. SO.


Here's your close up of the visual pattern. It's incredibly easy to follow, and if you're not familiar with visual patterns, this is a good one to start with. To start off, check out this link... The Craft Yarn Council's Crochet Chart Symbols . They even offer a PDF, so you can download and print and keep it handy as a quick reference. Oh, internet, you are so wonderful.


Thursday, December 6, 2012

Honeycomb Hexagons (Free!)

Lately I've...
...been on a bee kick (watching documentaries, reading books on bee keeping, buying local honey and consuming measurable quantities daily with my yogurt or on toast).
...been obsessed with the color yellow.
...been hoarding yellow cotton yarn for a blanket.
...been procrastinating in fulfilling my 'to do' list.

Here's the result: a honeycomb for my table top! (Don't worry, I'll tell you how!)


Initially I wanted to turn these 12 honey colored hexagons into a blanket. But. Wow. Hexagons are fatiguing! I take my hat off to anyone who has made a full sized hexagon blanket, and bailed out deciding that, as bee-utiful (see what I did there?) as a honeycomb blanket would be, something for the table seemed more appropriate. And shorter.

I joined the hexagons in a single night, weaved in those innumerable ends (I was not about to count them!) and voila! an asymmetrical tabletop centerpiece.

These hexagons are incredibly easy to make. The "difficult" part is joining them all together, and that isn't even difficult. Just tedious. So one day I'll make a full out blanket for myself, but today is not that day.

Wanna make some? There are endless possibilities right? Anything you'd use a hexagon or a motif for, you could simply adjust the colors and show off your love of bees (I can't be the only one!).

Honeycomb Hexagon!

Supplies List:
MC (honey colored- so light browns, any shade of yellow, etc)
CC (a color lighter or darker than the honey color- ecru white or dark brown)
5.5mm crochet hook
scissors
yarn needle

Honeycomb Hexagon:
With MC, ch 4. Join with sl st to first ch to form a ring.
Rnd 1: Ch2, dc into ring, ch1. *2dctog, ch 1 * 5 times around. Join with sl st to first dc. (6 dc clusters formed)
Rnd 2: Sl st into ch sp of previous row. ch2, dc into sp, ch 1. 2dctog, ch1 in same space. In each ch 1 space around work *2dctog, ch1, 2dctog, ch1 *. Join with sl st to first dc. (12 dc clusters)
Rnd 3: Sl st into ch sp of previous row. Ch2, work 2 dc in ch sp. *in next ch sp work 3dc, ch 2, 3dc (corner). In next ch sp work 3dc * repeating around until you've formed 6 corners. Join with sl st to first dc. Fasten off.
Rnd 4: Join CC. Sc in each st around, working *sc, ch2, sc * into corner space. Join with a sl st to first sc. Fasten off.

To join hexagons together, you can use the traditional method (right sides face each other, slip stitch them together in the back loops only) ~or~ you can check out this awesome tutorial for single-crochet-join-as-you-go. (You do need a ravelry account to download the pattern, but that's not a bad thing!)


Enjoy!!
Have a Lovely Day!
~Jess
***